how to draw 3d block letters a-z step by step
Objective
This lesson will teach y'all how to create 3-d block letters using i point perspective. Prerequisite to this lesson is One Signal Perspective – The Prism.
Materials
Ruler
Color Pencils
Pencil
Drawing newspaper or sketch pad
Elapsing of Projection
Between one to 2 45 minute class periods

Before you begin this lesson, watch the video below of a one bespeak perspective speed drawing to empathize the general concept.
Office ane
Pace 1 – If yous got here following the previous link (one-point perspective) Use the same newspaper that yous used to create the thinker model. Grab the paper and fold it in half five times.

Open it and you are left with 32 small-scale spaces.

Plow the paper over to the blank side and darken the lines with a pencil to create a grid.


Step ii – you lot are going to create the alphabet from a-z in block letter style.

before you begin, I desire you to empathize that you will be using the following shapes and lines to create the block letters. Below is a diagram that shows you the basic lines and shapes that you lot volition use to create the letters. You don't have to memorize anything, just exist enlightened. Await at the "M" shape in particular.

Step 3 – set the newspaper in front of you (landscape style). Look at the cake letter alphabet below. Focus on i letter at a time and draw each letter on each private infinite in your grid. find that you are using pure lines (generally) to create the block letters. Yous volition describe each letter from A to Z.


Step four – When yous complete the alphabet, evidence information technology to your teacher and ask for a new white sheet of paper or employ your sketch pad. Await at the templates below. Choose one you would like to use.

I chose template number 5. Describe the template design of you choice and depict it large on your white paper or sketch pad. (you may invent your own original template design if you wish)

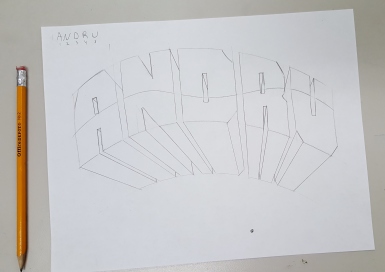
Step five – On the top corner write your outset name. Count the messages in your name. In the instance below, ANDRU has 5 letters. That ways that you volition create four marks that evenly carve up the spaces. If your proper noun has vii messages, you create 6 marks. If your name has iv messages you create 3 marks and so on…

Step six – When you (evenly) create your marks, go alee and use those marks to divide your newspaper. iv marks create five spaces. One for each letter in the name ANDRU.

Step seven –Draw a second line adjacent to each first line, like in the example beneath.

Step 8 – Erase the pinnacle and bottom lines in-between each two parallel lines to create separate squares. See example beneath.

Step 9 – Write your first name in block-letter fashion using each space for each letter of the alphabet.

Step x – You will turn every line inside the messages into a rectangular shape. See instance below.

Here is an example of how this is done with the block letters.

Stride 10 –Erase all the lines that you don't demand anymore. You are left with simply the block messages.

Step 11 – Describe a curved line through the letters. The curve can have many curves or a few curves. See example below.

Step 12 – This part is very important. You are going to draw a bend that is parallel to the curve that forms the lesser of the block letters. This will exist drawn betwixt the give-and-take and the vanishing indicate. Encounter case below.

Step 13 – Now erase the gaps of the commencement curved line.

Step xiv – Apply the 1-indicate perspective technique that y'all previously learned in 1-Point Perspective the prism to turn your cake messages into 3D block messages. Remember, one-point perspective means that yous are only using I vanishing point.
Revise that every appropriate corner or edge has a receding line. The instance "P" below has a missing receding line. This is a common error that you need to avoid.

Don't forget to draw the "parallels". See motion-picture show below.

Another common fault is your parallels. Always ensure that your parallel lines are actually parallel. The example below shows a letter "P" with it'due south parallel lines non parallel.

your instructor volition be checking that all your parallel lines are done correct.
Step 15 – You are now fix to color. The example below was colored with color pencils.

Footstep sixteen – Finally, Outline the perimeter with a marker or nighttime color pencil to make your proper noun stand out fifty-fifty more than.
Proceed to Emotional Control – Your Real Super Power for the follow up Project to this lesson.

Source: https://artclassbailiwick.com/2017/10/30/easiest-way-to-draw-block-letters/
0 Response to "how to draw 3d block letters a-z step by step"
Postar um comentário